


Using PowerPoint as photo-editing tool
Possibly you haven’t thought of Microsoft’s PowerPoint as a photo-editing program, but it does provide a good variety of editing tools. First insert your picture, making sure that the size-modifying circles at the four corners are activated. If you don’t see them, simply click on the picture. This will also activate your editing tool options at the bottom of the screen. If the tools show but don’t match the illustration, click on the tab at the far right to add what you need.
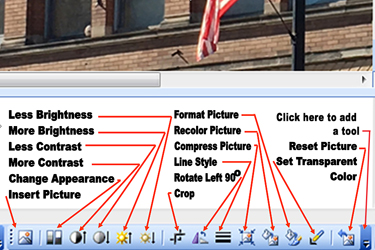
Refer to the illustration to see how each symbol functions. You can check previous articles to see how to resize your picture for your use. Anything you do that you don’t like, simply click on the Undo option under Edit.
Once you have the picture the way you want it, click on the View Show option under Slide Show at the top. This will produce a large image of your modified picture. Examine the image. If you are not satisfied with something, press the Esc key and fix it. When you are satisfied, press the Print Screen SysRq key (or the key with similar markings). Open your Photo Editing Program and click on File, then New, then Image from Clipboard. (or however your program is organized)
Do whatever you wish to do and click on Save As in the highest JPG or TIFF format. I have used PowerPoint for resizing, modifying brightness and contrast, and adding text, arrows, and position markers with a high degree of accuracy. If you don’t have PowerPoint, Google “Open Office”. It’s a free download and it might provide what you need.
POSTED: 01/12/18 at 8:51 am. FILED UNDER: Camera Club News