


Using ‘portrait’ mode on a smartphone
Portrait mode uses the dual cameras on your phone to create a depth-of-field effect by letting you keep your subject sharp while creating a nicely blurred background. It’s a great way to emphasize your subject. You can also add your choice of lighting effects.
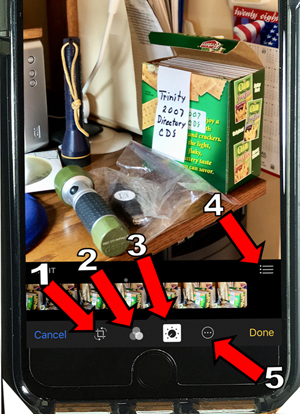
When you open your phone app, swipe left or right till “portrait” is directly above the white shutter release button. This setting will reveal five lighting variations for your photo. Swipe left or right till your choice is directly above “portrait”. Trip the shutter by any of the five different methods described in the March 14 article, “Using the Camera on Your Phone”. Refer to the illustration to understand the rest of the article.
You will notice that the picture you just took will appear as a small square at the lower left of your screen. Tapping on it will reveal a white strip at the bottom with four choices. If you want to change the appearance of the photo, tap on Edit. The No. 1 icon at the bottom left allows you to level the horizon or tip the picture left or right as much as desired. When you’re finished, tap on the Done at the lower right to return to the white strip and tap on Edit.
The No. 2 icon allows you to make color or B/W variations. Its slider provides seven color and three black-and-white options. Make your selection and tap on Done. You’re back to the white strip and tap Edit.
Now tap on the No. 3 icon. This will give you the choice of Light, Color, or B/W. Tapping on Light will show a slider to make lighting variations. To get seven more lighting option sliders, tap on the No. 4 icon. When satisfied, tap on “done” at the lower right, which sends you back to the white strip at the bottom and again, tap on edit.
Again tap on No. 3 and tap on Color. The slider will allow you to change the amount of color, and tapping on No. 4 lets you to also change the Saturation, Contrast, and Cast. When satisfied, tap on Done and go back to the Edit on the white strip.
If you wish to work in B/W, tap again on No. 3 and tap on the B&W, which reveals a slider with 7 variations. You can tap on No. 4 for four more options within that group. Tap on Done when you are satisfied with your adjustments.
No. 5 sends your work to another Photography App on your phone where you might want to crop or add text to finish up. The App Store has several good editing apps that are free downloads.
Hey, this is the best I could do with this feature. Reading it and doing it will probably help you understand the steps.
POSTED: 05/04/18 at 9:13 am. FILED UNDER: Camera Club News