


Meeting focus on understanding settings
I mentioned last week how impressed I was with Carrie McKeddie’s graphic about “Understanding Your Camera”. The ISO setting can influence your aperture setting, and, therefore, your shutter setting. Outside these three interrelated factors are the influences of the qualities of the lens, the amount of illumination and your purpose for taking the photo. Her chart should help you to decide your settings for good results.
Starting first with Aperture (derived from the Latin aperire (meaning to open), it is often expressed as an f-number. Notice as you move from left to right, the greater the amount of light entering the camera, but less of the background remains in focus. Another way to say it is your depth of field diminishes as the aperture gets larger.
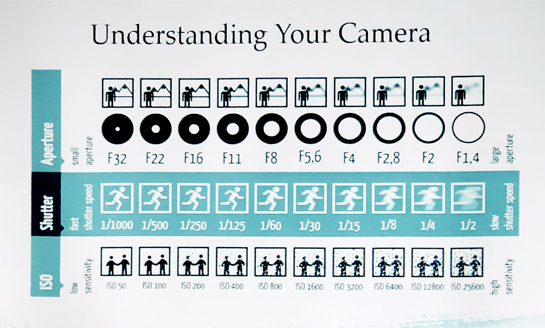
The bottom line is when the light is available and the background is important, use the settings to the left and when the light diminishes or only the subject is important, use the settings to the right to achieve proper exposure or to blur distracting elements in the background.
How quickly the subject or background is moving, how wind velocity is moving elements in the picture and making you unsteady, and whether you are in motion as you shoot, (such as in a moving car), will all influence your shutter speed. When freezing the movement is the priority, select the speeds to the left, and when you want to enhance a waterfall or have some motion blur to suggest movement or action, use the settings toward the right. Remember that a tripod becomes more important as you select speeds more to the right.
The ISO (International Organization for Standardization) setting determines how sensitive the camera will be to light. The brighter the circumstances, the more you can use the settings to the left, but as lighting decreases, (late evening or stage productions) the more your ISO selection must go to the right. The disadvantage (depending on the quality of your camera’s sensor) is that graininess (digital noise) increases at the higher settings. Your owner’s manual should tell you at what setting the picture will start to exhibit graininess and avoid that setting for the sharpest photo.
Carrie has agreed to speak at the Van Wert Area Photography Club’s next meeting on November 8 at 7 p.m. at 114 S. Race St. This will be a good opportunity to ask her questions related to this illustration.
POSTED: 10/25/18 at 11:11 pm. FILED UNDER: Camera Club News